|
The Planers are one of those woodworking machines that lone has one occupation. To take our wood and make it uniformly thick from end to end and there truly is next to no else it can do. Despite this limitation, the thickness planer is a required machine, and with a bit of development we can give a little bit of additional work to enable it to pay its direction Pack Planning Planers don't care for planing wood that is on end, it's simply to temperamental, yet there is the time where you might need to plane some bits of wood the very same width. Group planning requires some joining at least two boards together to make them sufficiently stable to go through the planer.  Shepherding Short Pieces This is like pack planing it that you utilize tape and some support, yet the enormous difference with this technique is that it's more to plane littler and shorter boards. The procedure utilizes two longer boards outwardly between a littler load up that is being planed in the center. It's essential to take note of that every one of the three boards needs to be near a similar thickness to begin, if the middle board is too high it could stick or progress toward becoming removed from either of the shepherd sideboards. The procedure is simple to lay every one of the three boards on a level surface, similar to your table saw deck, at that point squeeze them together so the tape sticks them all together and you are prepared to run them through the planer taking little trimming bites each time. Keeping away from Snipe Kill happens quite often happens while the best wood planer cutters marginally cut planning boards when the last, extremely end of the load up, and it leaves a little dejection toward the finish of the load up. More often than not close to the last three creeps of the board and the misery is about the thickness of 2 sheets of paper. Numerous woodworkers get around this by ensuring that the wood they utilize is cut to length AFTER it is planed, and that way they can cut the kill off. However that doesn't work, so the following most ideal approach to maintain a strategic distance from a kill is to push your wood through one directly after another and butt one end to another as they are experiencing an incredibly. You will evade killing on all board except that last one being pushed through that won't have a trailer behind it. Cutting Figured Wood One of the issues with planers that utilization straight blades, is that with figured wood, they can frequently leave "remove." The purpose behind this is numerous figured woods have the grain running in different ways than a bit of straight grain wood does. One approach to attempt and fix this is to run your wood slightly cockeyed as it goes through the planer. Presently you can just run it awry as wide as you planer seems to be. The wood will knock up against the machine closes, so with smaller planers, you don't get quite as wide a territory, yet I have still had great accomplishment with these. Adding one a Flat Surface Thickness planers have designed to make your wood even; they are not designed to smooth one side of a load up that might be twisted. Fortunately, you can join, or straighten one side just, of a load up, at that point flip it over when the one side is level, and plane the load up you normally would. The wood planer great way you can do this is by influencing a Planning To dance that will go about as an expansive jointer on your planer Planners are magnificent machines, and bit helps and with a bit of ingenuity they and so much more.
0 Comments
Luckily, the present Shower showcase offers something for everybody. Regardless of whether you're seeking a modern or traditional, one-piece or two-piece, or white or colored toilet, you're certain to find one that suits your requirements. Not certain where to begin? Give our guide a chance to walk you through the nuts and bolts of selecting a toilet! 1. Measure the rough- in In plumbing terms, a "rough- in" is the separation from the wall behind the toilet to the bolt cap of your toilet. Toilets normally have a 10", 12" or 14" unpleasant. This separation determines the type of toilet your handyman can install. While selecting a toilet, begin by measuring your toilet's rough in. You'll need to measure from wall to bolt-cap, not from molding to bolt-cap. 2. Pick a Toilet Style and Type Toilets arrive in an extensive variety of styles, including traditional, transitional, modern, mixed and contemporary. When you comprehend what you're looking for in style, you can then consider the type of toilet of that best suits your requirements. 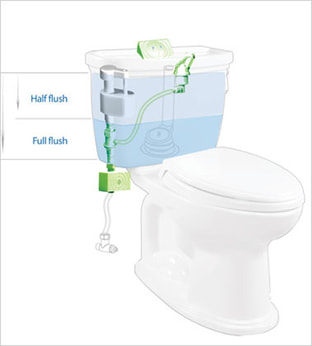 Toilet types include two-piece, one-piece, tankless and wall-mounted. The type of toilet that works best relies on an assortment of elements:
Two-piece Toilets comprise of two units: a bowl and a tank that is bolted to finish everything. Depending on the model, you might have the capacity to blend and match your bowl and tank. If you are interchanging your tank and bowl, ensure the tank safely lines up with your bowl's bolt gaps. One-piece Toilets flawlessly integrate the toilet and the bowl as one unit. This makes a smooth, clean look that is perfect for a modern or contemporary bathroom. One-piece toilets are less demanding to clean and install than two-piece toilets. Tankless Toilets omit the tank that is found in one-piece and two-piece toilets. This enables you to save space, providing a minimalist appearance that is corresponding to little and vast bathrooms alike. Tankless toilets are less demanding to clean than their tanked partners. They additionally regularly flush more rapidly and powerfully because they are specifically associated with a water supply line. Wall-mounted Toilets, additionally called wall-hung toilets, are bolted to the wall, saving floor space. If you have relatives with limited mobility, a wall-mounted toilet makes exchanges between wheelchairs and walkers simpler. This type of toilet is likewise perfect for littler bathrooms. Before selecting this toilet type, ensure that your walls are sufficiently thick to help the toilet. 3. Choose Round Bowl vs Elongated Bowl Next, you will need to consider your toilet bowl. Your bathroom's format will help determine the shape of your toilet bowl. The circular shape of a round bowl takes up little space, making it a decent answer for a little bathroom. For a bigger bathroom, consider a lengthened bowl for greatest comfort and style. An extended bowl is longer than the round bowl, taking on an oval appearance. 4. Take a gander at Flush Performance It's vital to choose a toilet with effective flushing power for your requirements. The guide is a brand-nonpartisan toilet-testing association that rates flush performance given strong waste evacuation. The performance edge ranges from 250 grams to 1,000 grams (the higher the amount, the better the flush performance). While few out of every odd model is recorded, Guide's unique database of more than 2,000 toilets is definitely justified regardless of a gander! Gravity Toilets use gravity to flush out waste. Water is put away in the tank and afterward discharged when the flush handle is actuated, flowing downwards to the bowl and excluding waste. This is the kind of toilet most commonly found in homes. Pressure assisted Toilets contain a mechanical tank inside your toilet tank. This plastic tank forces a flood of water out when the toilet is flushed, proficiently removing waste while conserving water. This type of toilet is much of the time found in commercial buildings. In spite of the fact that pressure-assisted toilets are more water-productive than gravity toilets, they are trickier to install. It's prescribed that you call a temporary plumbing worker to install this flushing framework. 5. Consider Water Proficiency Selecting a proficient water toilet helps the earth and empowers you to save $110+ a year on your water bills. Though the government flush standard is 1.6 gallons per flush, a proficient water toilet uses just 1.28 gallons per flush. Dual flush toilets are another water-conserving option. This type of toilet contains a flush handle that uses less water for flushing fluid waste than it improves the situation flushing strong waste. That way, you can use less water, generally speaking, saving high flush performance for when you require it. 6. Think about Accessibility Regardless of whether you're planning to remain in your house for quite a while or offer it, an ADA-agreeable toilet is dependably a decent investment. Open toilets highlight a toilet bowl height of 16-18" as opposed to the standard 14.5" inches. Named "comfort height," this toilet style takes into consideration included comfort and less demanding exchanges from wheelchairs or walkers. Looking for a new toilet? Visit the Myreviewcenter.com, to choose the perfect toilet for your bathroom. Along these lines, in the beginning, I specified what you could use a bench grinder for, but why to choose to use one over some other type of grinder. Indeed, first, they can do a lot of different things. Why have three different tools or more to do the activity that one bench grinder can do? Also, because it can do so many various projects, it is extremely financially savvy. Another thing that is incredible about a bench grinder is it is anything but difficult to use and maintain. When you have it set up legitimately, it is prepared to go. Reviews of best bench grinder at http://thereviewsearch.com/best-bench-grinder/ Simply mount it to your bench and have the wheels you usually use on it and probably you can begin using it rapidly. In conclusion, they offer a lot more control than littler handheld grinders can offer you. This is because you can stand while using it and also it has the tool rest to enable you to control the item into the grinding wheel. Select the Stone and the Right Speed Concerning using a bench grinder, it is basic. You put the right stone on it for the activity and then you set it at the right speed. From that point onward, you manage the tool watchful and delicate into the grinding wheel. The key thing is you want to make smooth developments. You don't want to twitch or get tired while using it. You want to be agreeable. Set the Bench Grinder up Right 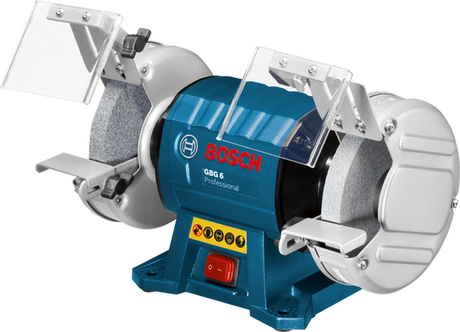 The major thing is to set the grinder up right. When mounting the wheel you want to make beyond any doubt that the washers are tight, so the wheel doesn't get dislodged. This is also vital for keeping the wheel adjusted. Back to the auto reference the grinder wheel resembles a tire and should be pivoted once in a while to get sure it is staying near and wearing accurately. You want to make beyond any doubt the wheel remains on track, so it doesn't be chip or fragment. One way to make beyond any doubt a grinding wheel is adjusted accurately is to give it a tap, and it should seem like a lodging chime. If it does, you are good, but if not, then you have to supplant it. Set the Right Speed When using the grinder, you also want to make beyond any doubt you are using it at the right speed given the wheel being used. You need to factor in the wheel material, but also the material you are grinding. As you grind heat builds up and this can cause the wheel to wear. You don't want the wheel getting too hot, or it can crack or explode. You can sue coolants to prevent this, but that isn't always the best option. It is smarter to be safe and work at a slower speed than to go too quick. Another thing that influences how quick a safe speed for the wheel is the wheel size. The greater the wheel, the slower you have to go. Simply make certain to peruse the packaging of the wheel you are using. Use the Best possible Angle The best possible angle you use depends on the material and the activity you are doing. If you require a sharp edge on something, then you will need to use a sharper angle. If you are simply using the grinder as a way to sand some material or polish some material, then you may not require as quite a bit of an angle. One key thing to recall however if you want to keep your load forward. The wheels are designed to control pressure coming down on them from the front and top. You never want to attempt to use the edge of the wheel or use it from the side. You may think you can get more use out of the stone, but this can intensely harm the grinder. This can begin the router to warp from the force and can also cause the stone to be harmed. Always keep the pressure forward and don't endeavor to extend the life of the stone by placing yourself at risk by using the side. Coolants and Rolling Pan 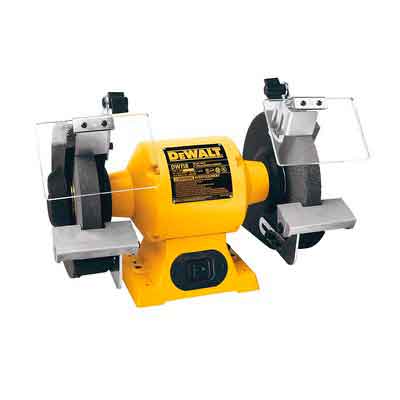 Back to discussing the issue of contact and overheating you need to select coolants. There is a dipping pan option where you plunge the metal you are working with into the coolant. This is strategy is advantageous and snappier. By having a dipping plate, you don't need to wait for the metal to chill off while working on it. The other option is a rolling pan.
The rolling pan cools the stone as it spins. By cooling the stone, you are not cooling the metal so the metal could even now warp as you take a shot at it. That is why for the most part the dipping pan is a superior option, but the dipping pan doesn't defend the stone from heat. You could always mix the options to protect everything. |
AuthorWrite something about yourself. No need to be fancy, just an overview. Archives
December 2018
Categories |
 RSS Feed
