|
Picking a toilet used to be a basic matter of finding a plan that fits you. Today, however, you'll have to pick among different mounting types, flushing strategies, bowl shapes, and different choices. Every alternative has its upsides and downsides, and what's directly for you relies upon your individual needs. Before you begin perusing for another toilet for your Southwest Florida home, get clear on your decisions so you can choose the model that is best for you. 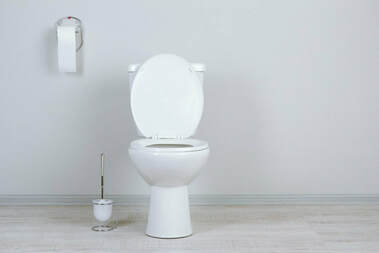 Measure for fit
Your initial phase in picking a toilet is to find your present toilets harsh in estimation so you can find a model that accommodates your bathroom. The hash in estimation is the separation from the wall to the center of the toilet spine, which lines up with the focal point of the hold-down jolts. For a toilet with two darts on each side, a measure of the focal point of the back jolt. If you're estimating from the most reduced pieces of the wall, consider the thickness of the baseboard or embellishment. Ideally, measure straightforwardly from the wall. The standard separation is 12 inches, but most toilet plans can suit a separation of 11 to 13 inches. Any more than or not as much as that, and you'll require a toilet structured specifically for this separation. That will undoubtedly be a 10-or 14-inch unpleasant on the model. It's also conceivable to install a toilet with a smaller harsh in than your present model. In this situation, you'll have a hole between the toilet and the wall. The exact opposite thing you need is to finish up with a toilet that neglects to flush away waste altogether or always obstructs. To ensure the model you pick won't give you inconvenience, search for toilets that accomplish high flushing execution. Greatest Performance Testing results give one approach to look at. This autonomous testing body assesses toilet for their capacity to flush waste completely. The guide keeps up a database that is accessible by maker and model, by highlights, for example, mounting type and bowl shape and by execution evaluations. With this database, you'll have the capacity to scan for toilets that satisfy EPA Water Sense Certification guidelines, ULNAR/Eco Energy necessities, and different principles. Correlation tests led by Consumer Reports and tests by toilet makers are also accessible. Maybe a couple of these tests use substances that look like what Map calls certifiable requests, so the outcomes aren't as solid as Map testing results. Pick your structure While picking a toilet, you'll have to choose if you need a one-piece, two-piece or wall-mount structure. Two-piece toilets are the most widely recognized. These pipes apparatuses have a different bowl and tank you can purchase together or independently. Because there are such huge numbers of available, settling on a two-piece toilet gives you a more noteworthy shot of finding one with the highlights you need. One-piece toilets typically have the tank, bowl, cover and different parts consolidated into one unit. The best favorable position of this kind of apparatus is fewer breaks. These installations are less demanding to clean because there are a couple of small cleft and joints. The smooth appearance and, regularly, the smaller size also claim to a few. They are, however, typically more costly than two-piece models. Because there are fewer parts to associate, installing a one-piece toilet may be quicker than installing a two-piece model. Then again, one-piece toilets are regularly substantial, which can make installation harder. Wall-mount toilets are the least regular plan and are significantly more costly to buy and install than floor-mounted models. They can work free after some time and may require modifying. Settle on bowl type Dual flush Toilet bowls are accessible in two shapes: prolonged and round. Extended bowls are around 2 or 3 inches longer in the front than round bowls. Round bowls never outperform 28 inches, while prolonging bowls can be as expansive as 31 inches. Notwithstanding the way that they consume up more room, stretched bowls offer a few points of interest. A few people, including the older and those with physical weaknesses, may find the greater seat more agreeable because it bolsters the thighs like a seat. These bowls also hold less ruining and keep down scents better. In a few, the streamlined oval shape is more visually engaging than the conventional round shape. In small bathrooms, however, the additional inches may be badly designed. Extended bowls bowls frequently marginally more costly than round, as well. Additionally, most toilet seats and covers are intended for round bowls. Seats and covers for stretched bowls are accessible, but they may be more enthusiastic to find. Settle on stature Standard toilets are around 15 inches from the seat to the floor. Although this tallness is agreeable for some, you may be in an ideal situation, picking a toilet with a higher seat. Seats of 17 inches high are promoted as "comfort stature" and are more qualified for the old and those with physical debilitations. Indeed, this is the tallest the American Disabilities Act requires four open toilets. Think about a double flush toilet Toilets represent up to 30 percent of the water use in the normal US home. If you've had terrible encounters with water-preserving toilets, however, picking a toilet intended to spare water may not appear to be excessively engaging. More seasoned models of water-sparing toilets just decreased the measure of water utilized, abandoning you with no decision about how much also use. More up to date models have changed that. In 1995, the Department of Energy measures restricting new toilets to 1.6 gallons per flush. All things being equal, 1.6 gallons may be more than expected to clean the bowl. A double flush toilet gives you a decision in the measure of water that you use. One flush discharges. 8 gallons of water, and the other flush discharges 1.6 gallons. In the normal family unit, double flush toilets diminish water use by 25 percent over more established water-monitoring models. In a few homes, the decrease may be as much as 67 percent. These models are frequently more costly than single-flush models. They also will in general clean the bowl-less completely, notwithstanding, when the higher-volume flush is utilized. Gravity versus pressure-assisted toilets Traditionally structured toilets are known as gravity toilets. They store water in a tank that is higher than the bowl. At the point when the toilet is flushed, the water is discharged, allowing gravity to maneuver it down into the bowl. Pressure-assisted toilets are a moderately new plan. They look like conventional toilets, but in the primary tank is an inward tank where air holds water under strain. When you flush the toilet, this water is constrained out at fast. The measure of pressure relies upon your home's water pressure. On the upside, they utilize less water than gravity toilets and clean the bowl more altogether. On the drawback, more seasoned models may be noisier, and both more established and more up to date models are more costly than customary toilets. Because they're less normal, they can be elusive parts for if something turns out badly. They're picking up ubiquity, however, and as of now make up around half of the new toilets acquired. Search for refunds Many water organizations offer refunds on the price tag of toilets and other pipes apparatuses that fulfill certain water-proficiency guidelines, for example, the EPA's Water Sense norms. When you've limited your decisions, get some information about any refunds. Picking a toilet isn't mind-boggling, but setting aside the opportunity to find out about your choices will enable you to find a model you'll be content with for a considerable length of time. If you'd like help picking the correct toilet, or you have other pipes issues you'd like to examine, contact Aqua Plumbing and Air. Wherever you are in the Sarasota or Bradenton region, we can enable you to keep your pipes running easily and productively.
0 Comments
Three-panel shower packs are fiberglass or acrylic panels that can be installed over any surface. This incorporates existing showers of tile, just as new showers done in bond backer board or drywall. The panels are requested to the measure of the shower and stuck into place. The holes for the shower controls and showerhead are cut nearby so the attack of the panels coordinates the current shower precisely. 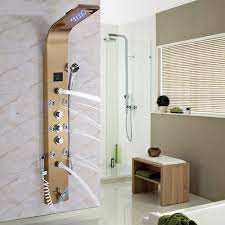 There are different types of installing shower panel:
1 Ensure the region where the panels will be installed is perfect, dry and free of free tiles or trash. If you're installing over drywall, apply a layer of waterproofing introduction first to help secure the zone behind it. Every other material can be secured as it stands. 2 Measure the situation of the shower valve and showerhead. Measure from the back wall in and from the bottom up. Make a layout out of a bit of cardboard, for example, the cardboard box the panels come in. Imprint the situation of the pipes on the cardboard and slice it fit. Place the cardboard on the wall as though it was the stainless steel shower panel to ensure the holes are in the right position. 3 Lay the cardboard layout over the panel to be installed on the wall of the pipe. Imprint the situation of the holes to be cut. Cut the holes utilizing a gas saw. Ensure the holes are somewhat smaller than the embellishing crest that will be installed over them. 4 Install the corner panels. Test fit them to ensure they work in the space, at that point bring them down and apply adhesive to the edges of the panel. Utilize the caulk firearm to enable you to apply the adhesive equally. Press the panels into place with your hands to enable them to follow. 5 Test-fit the back and side panels. Utilize the dimension to ensure they are going up straight. Make an imprint at the highest point of each panel to show its position. Remove the panels and put them aside. 6 Measure down 1 inches from where the highest points of the panels sit and run a globule of adhesive along this line. Apply another dot of adhesive every 12 creeps down each panel, 3 crawls in from each side. 7 Press the panels into place. Twofold checks their situation with the dimension and press them down immovably with your hands to follow them. 8 Run a dot of silicone caulk adhesive at every one of the creases in the panels to seal them in. Smooth the caulk down with your pointer. Give the caulk and adhesive dry for 24 hours before installing the shower valve a chance to cover and showered. I trust that in the wake of perusing this article now every one of you can install your three pack, shower panel with no sorts of problem. I am attempting my best to examine how to install a free unit, shower panel. Much obliged to you such a great amount for remaining with me. A hammer drill is a kind of rotary drilling device that is utilized for drilling through hard and weak surfaces like concrete and tile. There are various tips and traps that you can use so as to make this drilling procedure quicker and simpler. A portion of these tips is recorded beneath. 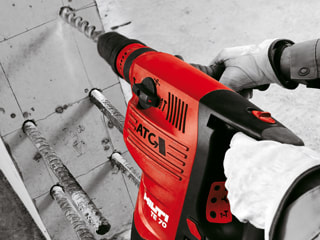 Pressure
Utilize the perfect measure of the pressure when utilizing a hammer drill or rotary hammer. Utilizing excessive pressure when drilling with a hammer drill can harm the engine of the drill, particularly if you aren't utilizing a hardcore proficient model. Applying excessive pressure will also harm the tip of the Bosch bulldog hammer drill bit. Control Warmth and Residue Drilling into tile and concrete can make extensive billows of rough and in some cases undesirable residue. Adding some water to your work amid the drilling procedure will prevent the arrangement of residue and will also cool the flutes of your bit while drilling, broadening the life of your drill bit. Get Out Woodwinds Sporadically When drilling through more profound materials, you have to clear the drill bit woodwinds and the opening of residue at times. This can be cultivated just by tenderly moving the bait all over more than once every 30 seconds or so of drilling. Utilization of Right Bits When drilling through hard or fragile substances like concrete or tile, unique stonework bits are utilized. This sort of bit has a carbide tip formed like a precious stone at the tip. Drill bits intended for different kinds of surfaces, for example, wood and metal, cut from shaving little cuts of the material being drilled, while a stonework bit really breaks the outside of the material being drilled, and the flutes divert the material. If you attempt and utilize a wood or metal drill bit in concrete or tile, you won't drill extremely profound before wearing out the tip of the bit and conceivably the drill engine. Prevent Jams Every from time to time you're going to hit something other than simply concrete when drilling. Particularly if you're drilling through either total concrete or strengthened concrete. Even a fresh out of the box new workmanship drill bit won't be ready to drill through the stones of the total or the repair of strengthening concrete. When you bit hits something it can't drill through, you either need to attempt and drill somewhere else, or get through the item causing the jam. This can ordinarily be cultivated by embedding a concrete nail in your gap and hitting it a couple of times, hard, with a hammer. Unplug When Changing Bits Likewise with other power tools, when changing bits in your hammer drill or rotary hammer, dependably make certain to disengage the instrument of power before changing bits so as to prevent mishaps brought about by unintentionally hitting the power switch while changing the bit. Individual Defensive Hardware Whenever utilizing powerful tools, ensuring your well being and security is critical thought. You ought to dependably wear wellbeing glasses that meet or surpass the necessities for Z87.1 certification by the American National Measures Organization, also called ANSI. If you find that your sinks are loaded with stains and your skin is dry and bothersome, you may have an issue with hard water. If along these lines, you may require a water softener. Water softening frameworks will expand the lifespan of your pipes and your garments, and in addition, decreasing your financial plan. 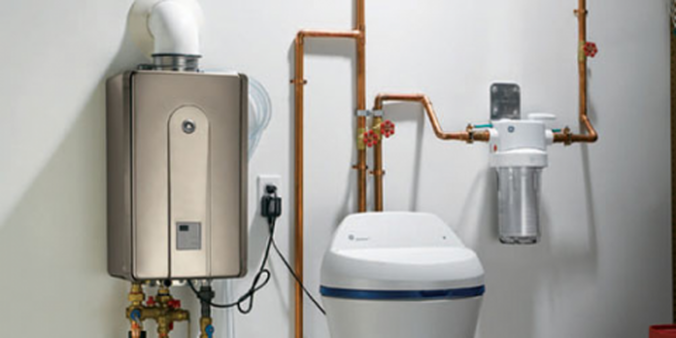 Fundamentally, water softeners take out additional calcium and magnesium particles utilizing a trade with sodium or potassium particles. When this trade happens, the water softener will recover and flush the arrangement of abundance particles until the point when it has energized them with new sodium particles. This may use around 25 gallons of water for each day, so it's essential to decide your water hardness first. When all is told in done, by keeping the development of scale, water softeners can build the life of your water radiator. Here are the five signs you require a water softener. 1. You see scale development on your machines. If you have a scale, you likely have hard water. Mineral stores can frame on teapots and espresso pots and they can likewise develop inside the channels. This obstructs plumbing so much that your home is in reality less compelling at going water through the funnels. The result of hard water is scale development and damaged pipes. Scale, or "limescale," is a hard, powdery substance made up of calcium and magnesium bicarbonate. These salts are what frame the white pale nature of the developments. Water softeners can lessen this development of scale by utilizing particle trade innovation. 2. Your skin and air are dry. Hard water can really cause irritated dry skin and hair on the grounds that there are so much additional calcium and magnesium salts gliding around in your water. Cleanser and cleanser can just keep this to such an extent. What occurs is that water on your skin doesn't feed it,it just dries it out. Minerals in water improve on your skin and cleanser that doesn't break up well in hard water can't evacuate them. This leaves a buildup on skin that chafes it and makes it feel dry and unpleasant. Hard water squares pore and causes more aggravation and clogged pores. It likewise makes your skin rough and dry, while discoloring it the manner in which that glass without being washed will discolor in the dishwasher. 3. Your garments are dark and blurred. Seeing that your garments and bedsheets now look blurred is an indication of hard water. They may feel scratchy and be hard to wash because there is so much additional mineral substance contained in your water. One thing you can do to reduce the grayness that originates from having hard water is to get a front loader clothes washer with fluid cleanser. You can really get Calgon fluid water softening cleanser or add vinegar to the texture softening compartment. Have a go at getting so sodium tripolyphosphate and adding it to your wash also. At last, the ideal approach to disposing of this dim mineral quality in your clothing is to get the best water softener 2018 at The Review Search. 4. You see recolors on the sinks and baths. Any stains deserted from mineral buildup are an indication of hard water. These stains shape when tap water dissipates, abandoning calcium and magnesium. If you have seen mortar like stores in the bath and on the fixtures, there are approaches to evacuate them. Utilize a tad of vinegar and wipe around the base. You can likewise give the planes on your tuba chance to keep running for around 15 minutes and let douse for an hour or something like that. Pouring in a measure of dye and a half container powdered dishwasher cleanser will likewise expel these mineral stores. However, a potassium chloride water softener will be best at for all time expelling stains and keeping them gone for good. You can get a water testing unit to decide how much mineral overabundance is in your water supply. 5. Your pipes are in steady need of a fix. Steel channels are the most exceedingly bad for hard water. They are effectively harmed from the development of limescale. Your water just won't stream too. Copper and PVC funnels improve the situation with hard water. Since the stream in your channels will turn out to be more limited as the water weight is brought down from an excess of mineral, limescale development will occur at a quicker rate. If limescale begins developing around the valves in your clothes washer and dishwasher, the valves can't close totally, which prompts water spillage. This is an issue in decreasing the lifespan of your home apparatuses. Fixing your pipes all the time is costly and causes additional wear on the house, so it's smarter to figure out how to anticipate it. You can find some other important topics here. The Planers are one of those woodworking machines that lone has one occupation. To take our wood and make it uniformly thick from end to end and there truly is next to no else it can do. Despite this limitation, the thickness planer is a required machine, and with a bit of development we can give a little bit of additional work to enable it to pay its direction Pack Planning Planers don't care for planing wood that is on end, it's simply to temperamental, yet there is the time where you might need to plane some bits of wood the very same width. Group planning requires some joining at least two boards together to make them sufficiently stable to go through the planer.  Shepherding Short Pieces This is like pack planing it that you utilize tape and some support, yet the enormous difference with this technique is that it's more to plane littler and shorter boards. The procedure utilizes two longer boards outwardly between a littler load up that is being planed in the center. It's essential to take note of that every one of the three boards needs to be near a similar thickness to begin, if the middle board is too high it could stick or progress toward becoming removed from either of the shepherd sideboards. The procedure is simple to lay every one of the three boards on a level surface, similar to your table saw deck, at that point squeeze them together so the tape sticks them all together and you are prepared to run them through the planer taking little trimming bites each time. Keeping away from Snipe Kill happens quite often happens while the best wood planer cutters marginally cut planning boards when the last, extremely end of the load up, and it leaves a little dejection toward the finish of the load up. More often than not close to the last three creeps of the board and the misery is about the thickness of 2 sheets of paper. Numerous woodworkers get around this by ensuring that the wood they utilize is cut to length AFTER it is planed, and that way they can cut the kill off. However that doesn't work, so the following most ideal approach to maintain a strategic distance from a kill is to push your wood through one directly after another and butt one end to another as they are experiencing an incredibly. You will evade killing on all board except that last one being pushed through that won't have a trailer behind it. Cutting Figured Wood One of the issues with planers that utilization straight blades, is that with figured wood, they can frequently leave "remove." The purpose behind this is numerous figured woods have the grain running in different ways than a bit of straight grain wood does. One approach to attempt and fix this is to run your wood slightly cockeyed as it goes through the planer. Presently you can just run it awry as wide as you planer seems to be. The wood will knock up against the machine closes, so with smaller planers, you don't get quite as wide a territory, yet I have still had great accomplishment with these. Adding one a Flat Surface Thickness planers have designed to make your wood even; they are not designed to smooth one side of a load up that might be twisted. Fortunately, you can join, or straighten one side just, of a load up, at that point flip it over when the one side is level, and plane the load up you normally would. The wood planer great way you can do this is by influencing a Planning To dance that will go about as an expansive jointer on your planer Planners are magnificent machines, and bit helps and with a bit of ingenuity they and so much more. Luckily, the present Shower showcase offers something for everybody. Regardless of whether you're seeking a modern or traditional, one-piece or two-piece, or white or colored toilet, you're certain to find one that suits your requirements. Not certain where to begin? Give our guide a chance to walk you through the nuts and bolts of selecting a toilet! 1. Measure the rough- in In plumbing terms, a "rough- in" is the separation from the wall behind the toilet to the bolt cap of your toilet. Toilets normally have a 10", 12" or 14" unpleasant. This separation determines the type of toilet your handyman can install. While selecting a toilet, begin by measuring your toilet's rough in. You'll need to measure from wall to bolt-cap, not from molding to bolt-cap. 2. Pick a Toilet Style and Type Toilets arrive in an extensive variety of styles, including traditional, transitional, modern, mixed and contemporary. When you comprehend what you're looking for in style, you can then consider the type of toilet of that best suits your requirements. 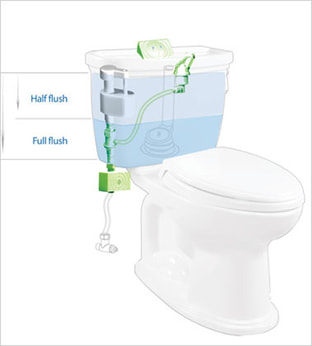 Toilet types include two-piece, one-piece, tankless and wall-mounted. The type of toilet that works best relies on an assortment of elements:
Two-piece Toilets comprise of two units: a bowl and a tank that is bolted to finish everything. Depending on the model, you might have the capacity to blend and match your bowl and tank. If you are interchanging your tank and bowl, ensure the tank safely lines up with your bowl's bolt gaps. One-piece Toilets flawlessly integrate the toilet and the bowl as one unit. This makes a smooth, clean look that is perfect for a modern or contemporary bathroom. One-piece toilets are less demanding to clean and install than two-piece toilets. Tankless Toilets omit the tank that is found in one-piece and two-piece toilets. This enables you to save space, providing a minimalist appearance that is corresponding to little and vast bathrooms alike. Tankless toilets are less demanding to clean than their tanked partners. They additionally regularly flush more rapidly and powerfully because they are specifically associated with a water supply line. Wall-mounted Toilets, additionally called wall-hung toilets, are bolted to the wall, saving floor space. If you have relatives with limited mobility, a wall-mounted toilet makes exchanges between wheelchairs and walkers simpler. This type of toilet is likewise perfect for littler bathrooms. Before selecting this toilet type, ensure that your walls are sufficiently thick to help the toilet. 3. Choose Round Bowl vs Elongated Bowl Next, you will need to consider your toilet bowl. Your bathroom's format will help determine the shape of your toilet bowl. The circular shape of a round bowl takes up little space, making it a decent answer for a little bathroom. For a bigger bathroom, consider a lengthened bowl for greatest comfort and style. An extended bowl is longer than the round bowl, taking on an oval appearance. 4. Take a gander at Flush Performance It's vital to choose a toilet with effective flushing power for your requirements. The guide is a brand-nonpartisan toilet-testing association that rates flush performance given strong waste evacuation. The performance edge ranges from 250 grams to 1,000 grams (the higher the amount, the better the flush performance). While few out of every odd model is recorded, Guide's unique database of more than 2,000 toilets is definitely justified regardless of a gander! Gravity Toilets use gravity to flush out waste. Water is put away in the tank and afterward discharged when the flush handle is actuated, flowing downwards to the bowl and excluding waste. This is the kind of toilet most commonly found in homes. Pressure assisted Toilets contain a mechanical tank inside your toilet tank. This plastic tank forces a flood of water out when the toilet is flushed, proficiently removing waste while conserving water. This type of toilet is much of the time found in commercial buildings. In spite of the fact that pressure-assisted toilets are more water-productive than gravity toilets, they are trickier to install. It's prescribed that you call a temporary plumbing worker to install this flushing framework. 5. Consider Water Proficiency Selecting a proficient water toilet helps the earth and empowers you to save $110+ a year on your water bills. Though the government flush standard is 1.6 gallons per flush, a proficient water toilet uses just 1.28 gallons per flush. Dual flush toilets are another water-conserving option. This type of toilet contains a flush handle that uses less water for flushing fluid waste than it improves the situation flushing strong waste. That way, you can use less water, generally speaking, saving high flush performance for when you require it. 6. Think about Accessibility Regardless of whether you're planning to remain in your house for quite a while or offer it, an ADA-agreeable toilet is dependably a decent investment. Open toilets highlight a toilet bowl height of 16-18" as opposed to the standard 14.5" inches. Named "comfort height," this toilet style takes into consideration included comfort and less demanding exchanges from wheelchairs or walkers. Looking for a new toilet? Visit the Myreviewcenter.com, to choose the perfect toilet for your bathroom. Along these lines, in the beginning, I specified what you could use a bench grinder for, but why to choose to use one over some other type of grinder. Indeed, first, they can do a lot of different things. Why have three different tools or more to do the activity that one bench grinder can do? Also, because it can do so many various projects, it is extremely financially savvy. Another thing that is incredible about a bench grinder is it is anything but difficult to use and maintain. When you have it set up legitimately, it is prepared to go. Reviews of best bench grinder at http://thereviewsearch.com/best-bench-grinder/ Simply mount it to your bench and have the wheels you usually use on it and probably you can begin using it rapidly. In conclusion, they offer a lot more control than littler handheld grinders can offer you. This is because you can stand while using it and also it has the tool rest to enable you to control the item into the grinding wheel. Select the Stone and the Right Speed Concerning using a bench grinder, it is basic. You put the right stone on it for the activity and then you set it at the right speed. From that point onward, you manage the tool watchful and delicate into the grinding wheel. The key thing is you want to make smooth developments. You don't want to twitch or get tired while using it. You want to be agreeable. Set the Bench Grinder up Right 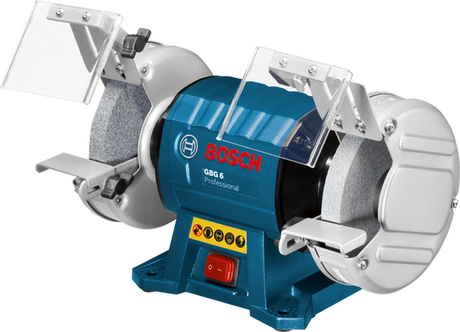 The major thing is to set the grinder up right. When mounting the wheel you want to make beyond any doubt that the washers are tight, so the wheel doesn't get dislodged. This is also vital for keeping the wheel adjusted. Back to the auto reference the grinder wheel resembles a tire and should be pivoted once in a while to get sure it is staying near and wearing accurately. You want to make beyond any doubt the wheel remains on track, so it doesn't be chip or fragment. One way to make beyond any doubt a grinding wheel is adjusted accurately is to give it a tap, and it should seem like a lodging chime. If it does, you are good, but if not, then you have to supplant it. Set the Right Speed When using the grinder, you also want to make beyond any doubt you are using it at the right speed given the wheel being used. You need to factor in the wheel material, but also the material you are grinding. As you grind heat builds up and this can cause the wheel to wear. You don't want the wheel getting too hot, or it can crack or explode. You can sue coolants to prevent this, but that isn't always the best option. It is smarter to be safe and work at a slower speed than to go too quick. Another thing that influences how quick a safe speed for the wheel is the wheel size. The greater the wheel, the slower you have to go. Simply make certain to peruse the packaging of the wheel you are using. Use the Best possible Angle The best possible angle you use depends on the material and the activity you are doing. If you require a sharp edge on something, then you will need to use a sharper angle. If you are simply using the grinder as a way to sand some material or polish some material, then you may not require as quite a bit of an angle. One key thing to recall however if you want to keep your load forward. The wheels are designed to control pressure coming down on them from the front and top. You never want to attempt to use the edge of the wheel or use it from the side. You may think you can get more use out of the stone, but this can intensely harm the grinder. This can begin the router to warp from the force and can also cause the stone to be harmed. Always keep the pressure forward and don't endeavor to extend the life of the stone by placing yourself at risk by using the side. Coolants and Rolling Pan 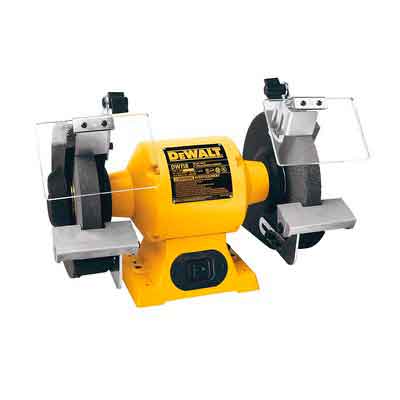 Back to discussing the issue of contact and overheating you need to select coolants. There is a dipping pan option where you plunge the metal you are working with into the coolant. This is strategy is advantageous and snappier. By having a dipping plate, you don't need to wait for the metal to chill off while working on it. The other option is a rolling pan.
The rolling pan cools the stone as it spins. By cooling the stone, you are not cooling the metal so the metal could even now warp as you take a shot at it. That is why for the most part the dipping pan is a superior option, but the dipping pan doesn't defend the stone from heat. You could always mix the options to protect everything. The vast majority don't know how to perform a good car wash at home. But then, a great many people attempted at any rate once. Obviously, you can find a car wash at each corner or have a mobile detailer come at your area in 3 hours; you can likewise do it without anyone else's help. Or, you can have a mobile detailer go to your area to do it for you. This is the thing that Washes offers you. Give us a chance to disclose to you how all our mobile detailer provides you with a basic mobile car wash. 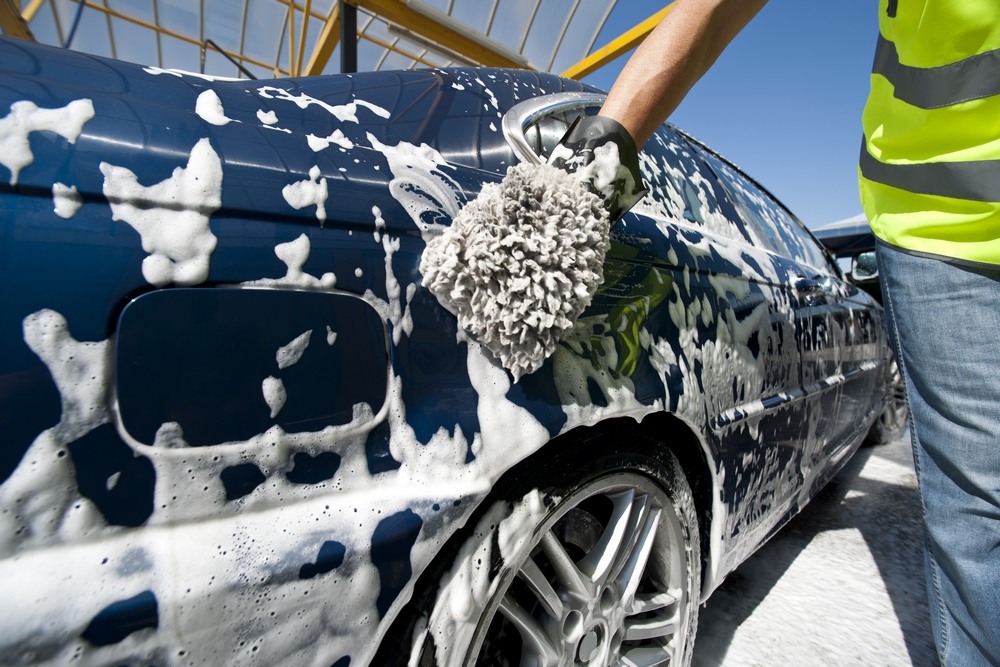 1. Start with the Interior The initial step is to work on the interior. Open every one of the ways to release some air into the car and start by cleaning all the huge junk out of the car. Then, vacuum the interior, the carpets, the seats, the dashboard and the air vents altogether. Do the same thing in the trunk. You might be like to review best car cleaning products here. When this is done, perform a wipe-down of the considerable number of surfaces of the car with microfiber towels. You can use special products here like plastic dressing to have all the plastic surfaces shine and look new, or you can use leather conditioning on the off chance that you have leather car seats. You can likewise find good waterless products specialized for interior itemizing. These products will leave a good scent in your car and uncover your interior. On the off chance that you have pet hair inside your car, you can use a rubber or vinyl gloves to evacuate these. 2. Clean the Windows The last piece of the interior cleaning is the windows. You need to use a special window cleaner to do these. Likewise, always use the same strategy to clean the windows and don't go circles. Go for straight moves from left to right or through and through. Once the interior is done, you then have to clean every one of the windows on the outside of the car. It is the same procedure as the interior ones. In any case, if you washed the interior windows from left to right, go start to finish on the outside. Using two different ways will enable you to see which side is not clean toward the finish of the wash rapidly. 3. Wash the bodywork You can now work on the outside of the vehicle. There are two essential procedures: – On the off chance that you use water, you will require car enumerating soap and no less than two buckets. If you need not use much water, you can wash the bodywork with soapy water and microfiber towels. Otherwise, you can use a hose everywhere on your car with soap and after that dry the car. Paint protection tips. – If you use waterless products, you require two microfiber towels. Once to wipe down the car with waterless products and the other one to wipe off the residues of the waterless products that are profoundly thought. There once more, you would prefer not to go circles on the bodywork. Additionally, make a point to focus on the edges, air vent and other thin places where dirt and contaminants pill on. 4. Provide extra care You are relatively done with your car wash when landing at this step. You can now provide the extra care your car merit as long as you have the correct gear to do as such. What a standout amongst the most famous extra care individuals does by themselves is Motor Cleaning. Cleaning the whole motor compartment is not that troublesome on the off chance that you have a hose. Use some grease remover and spray water in the compartment. Be that as it may, try to do it amid the day where the motor does sundry appropriately. If you suffocate the motor, the car may not start immediately! Tips for car care yourself. 5. Dress the tires and clean the wheels The last step of the perfect car wash is to wash and dress the tires. In the first place, start by spraying grease remover on the wheels. Then, using a cloth, altogether clean the wheels by going into every lacuna. With the correct product, all the grease should fall off immediately. Then, use a tire dressing product that you spray and apply with a brush. It will give your tire a shiny look and include an extra layer of protection to your wheels. The perfect car wash is the thing that our mobile car detailers provide with the Lavish bundle of Washoe. Even, however, we call it a mobile car wash it is the thing that we can call a mobile smaller than expected detail as we spend time on the little subtle elements. Try one, and you'll see that you will never look at your corner car rewash the same way!
|
AuthorWrite something about yourself. No need to be fancy, just an overview. Archives
December 2018
Categories |
 RSS Feed
