|
Three-panel shower packs are fiberglass or acrylic panels that can be installed over any surface. This incorporates existing showers of tile, just as new showers done in bond backer board or drywall. The panels are requested to the measure of the shower and stuck into place. The holes for the shower controls and showerhead are cut nearby so the attack of the panels coordinates the current shower precisely. 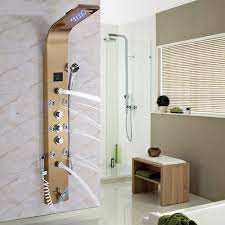 There are different types of installing shower panel:
1 Ensure the region where the panels will be installed is perfect, dry and free of free tiles or trash. If you're installing over drywall, apply a layer of waterproofing introduction first to help secure the zone behind it. Every other material can be secured as it stands. 2 Measure the situation of the shower valve and showerhead. Measure from the back wall in and from the bottom up. Make a layout out of a bit of cardboard, for example, the cardboard box the panels come in. Imprint the situation of the pipes on the cardboard and slice it fit. Place the cardboard on the wall as though it was the stainless steel shower panel to ensure the holes are in the right position. 3 Lay the cardboard layout over the panel to be installed on the wall of the pipe. Imprint the situation of the holes to be cut. Cut the holes utilizing a gas saw. Ensure the holes are somewhat smaller than the embellishing crest that will be installed over them. 4 Install the corner panels. Test fit them to ensure they work in the space, at that point bring them down and apply adhesive to the edges of the panel. Utilize the caulk firearm to enable you to apply the adhesive equally. Press the panels into place with your hands to enable them to follow. 5 Test-fit the back and side panels. Utilize the dimension to ensure they are going up straight. Make an imprint at the highest point of each panel to show its position. Remove the panels and put them aside. 6 Measure down 1 inches from where the highest points of the panels sit and run a globule of adhesive along this line. Apply another dot of adhesive every 12 creeps down each panel, 3 crawls in from each side. 7 Press the panels into place. Twofold checks their situation with the dimension and press them down immovably with your hands to follow them. 8 Run a dot of silicone caulk adhesive at every one of the creases in the panels to seal them in. Smooth the caulk down with your pointer. Give the caulk and adhesive dry for 24 hours before installing the shower valve a chance to cover and showered. I trust that in the wake of perusing this article now every one of you can install your three pack, shower panel with no sorts of problem. I am attempting my best to examine how to install a free unit, shower panel. Much obliged to you such a great amount for remaining with me.
0 Comments
Leave a Reply. |
AuthorWrite something about yourself. No need to be fancy, just an overview. Archives
December 2018
Categories |
 RSS Feed
